
Ceramic Tiled Bathroom Transformed in Barnsley
I think you will be impressed with the renovation of this Ceramic Tiled Bathroom that I completed last year in Barnsley. It’s a great example of how to refresh the appearance of a bathroom without going through the expense of replacing the tiling.

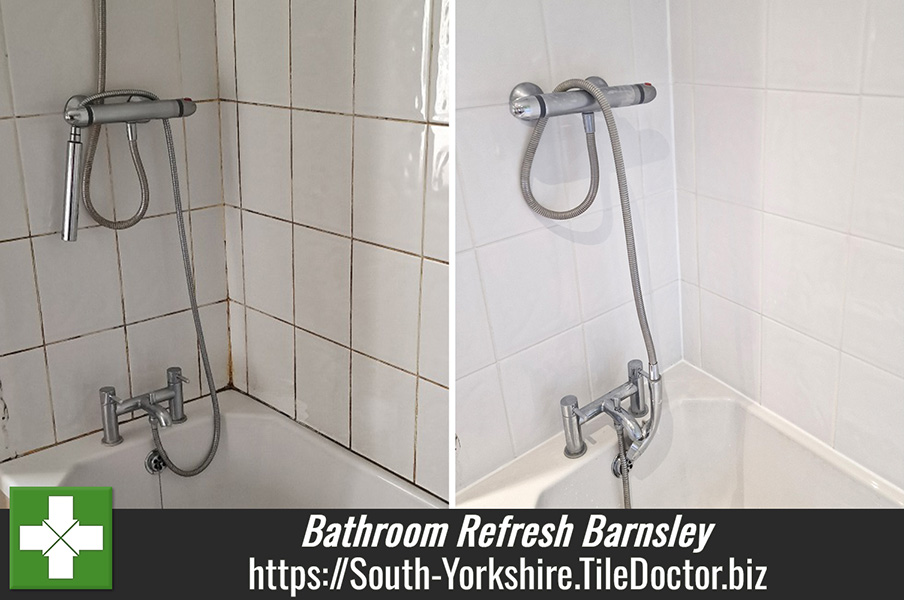
The bathroom was in desperate need of some TLC. The grout was crumbling, mouldy and heavily stained plus the silicone needed replacing and the tiles had a dirty film on them. A new bathroom costs anywhere from ten thousand points upwards so getting some more years out of your bathroom by having it refreshed makes a lot of sense.
Having discussed the bathroom with the client I recommended giving the tile and grout a deep clean, replacing the grout where needed and then re-colouring the grout with a white colourant to achieve a consistent fresh appearance. The work would be completed in less than a day and wouldn’t need any expensive products. I worked out a detailed quote which was accepted and a date agreed.

Deep Cleaning Ceramic Bathroom Tile and Grout
The first task was to address the crumbling and loose grout which had to be scraped out and replaced with fresh white grout. Once that had set the cleaning started for which I used Tile Doctor Duo-Clean which is an effective double action grout cleaner and mould remover. It’s sprayed onto the surface and then left to soak in before being scrubbed with a stiff brush.
After rinsing down the tile and grout to remove the soiling it was wiped over and left to dry whiles the silicone sealant was grubby and mouldy was stripped out.
Applying White Grout Colourant to Ceramic Bathroom Tiles
Once dry a white Tile Doctor Grout Colourant was applied the grout lines with a small brush. A steady hand is required, and you need to ensure any excess is immediately wiped away before it dries. It is quite a slow job, but very satisfying when you see the difference it makes. The colourant also seals in the grout with an impermeable barrier so it keeps it appearance.
The last step was to put back the silicone with a good quality mould resistant sealant.

The customer was over the moon with the transformation; the tiles were now clean and the once grubby grout now a consistent white that would be easy to keep clean. For aftercare cleaning I recommended using Tile Doctor Aqua Pro which is pH neutral and gentle enough to use on a regular basis, it also has a nice fresh smell.

Professional Bathroom Tile and Grout Cleaning Service in Yorkshire
Ceramic Tiled Bathroom Transformed in Barnsley Read More »


