Work by Category

South-Yorkshire-Tile-Doctor

Welcome to my Work History archive where you will find detailed examples of Tile, Grout and Stone Cleaning and Renovation work carried out through South-Yorkshire.

To make things easier to find I have organised the posts by the most popular types of Tile and Stone. I also renovate other materials so if you’re looking for something else do get in touch as it’s highly likely we have the solution.

Popular requests include Ceramic Tile, Encaustic Cement, Fireplaces, Flagstone Pavers, Grout Cleaning, Limestone, Marble, Porcelain Tile, Quarry Tile, Sandstone, Slate, Terracotta Tile, Terrazzo Floors, Travertine, Victorian Flooring and Vinyl Floors.

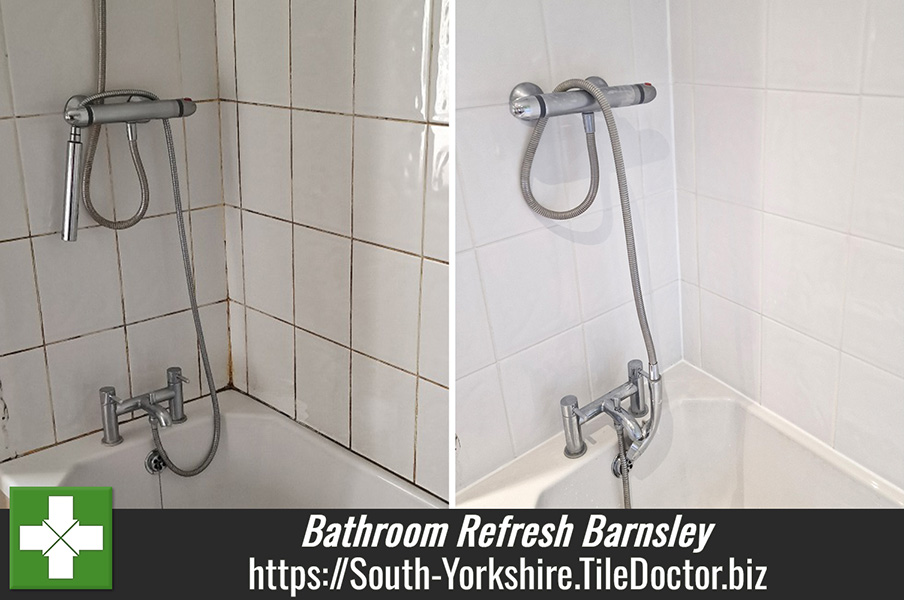
Ceramic Tiled Bathroom Refresh Barnsley

Ceramic Tiled Bathroom Transformed in Barnsley

I think you will be impressed with the renovation of this Ceramic Tiled Bathroom that I completed last year in Barnsley. It’s a great example of how to refresh the appearance of a bathroom without going through the expense of replacing the tiling.

Ceramic Tiled Bathroom Before Refresh Barnsley

The bathroom was in desperate need of some TLC. The grout was crumbling, mouldy and heavily stained plus the silicone needed replacing and the tiles had a dirty film on them. A new bathroom costs anywhere from ten thousand points upwards so getting some more years out of your bathroom by having it refreshed makes a lot of sense.

Having discussed the bathroom with the client I recommended giving the tile and grout a deep clean, replacing the grout where needed and then re-colouring the grout with a white colourant to achieve a consistent fresh appearance. The work would be completed in less than a day and wouldn’t need any expensive products. I worked out a detailed quote which was accepted and a date agreed.

Ceramic Tiled Bathroom Before Refresh Barnsley

Deep Cleaning Ceramic Bathroom Tile and Grout

The first task was to address the crumbling and loose grout which had to be scraped out and replaced with fresh white grout. Once that had set the cleaning started for which I used Tile Doctor Duo-Clean which is an effective double action grout cleaner and mould remover. It’s sprayed onto the surface and then left to soak in before being scrubbed with a stiff brush.

After rinsing down the tile and grout to remove the soiling it was wiped over and left to dry whiles the silicone sealant was grubby and mouldy was stripped out.

Applying White Grout Colourant to Ceramic Bathroom Tiles

Once dry a white Tile Doctor Grout Colourant was applied the grout lines with a small brush. A steady hand is required, and you need to ensure any excess is immediately wiped away before it dries. It is quite a slow job, but very satisfying when you see the difference it makes. The colourant also seals in the grout with an impermeable barrier so it keeps it appearance.

The last step was to put back the silicone with a good quality mould resistant sealant.

Ceramic Tiled Bathroom After Refresh Barnsley

The customer was over the moon with the transformation; the tiles were now clean and the once grubby grout now a consistent white that would be easy to keep clean. For aftercare cleaning I recommended using Tile Doctor Aqua Pro which is pH neutral and gentle enough to use on a regular basis, it also has a nice fresh smell.

Ceramic Tiled Bathroom After Refresh Barnsley


Professional Bathroom Tile and Grout Cleaning Service in Yorkshire

Ceramic Tiled Bathroom Transformed in Barnsley Read More »

Victorian Tiled Hallway Floor Repair and Restoration Sheffield

Full Restoration of a 135-Year-Old Victorian Tiled Hallway Floor in Sheffield

This 135-year-old Victorian Tiled floor was uncovered in the hallway of a property in Sheffield by the owner. It had been hidden away under carpet and a floor matt for decades before it was discovered and this was probably due to the state it was in with lots of cracked and loose tiles.

Victorian Tiled Hallway Floor Before Restoration Sheffield

The owner was keen to have it restored as an original feature that would add value to the property and was told by one contractor that it was beyond repair. Undeterred he reached out to Tile Doctor for a second opinion and having worked on numerous floors like this one I was more than happy to provide a quote for its restoration.

I visited the property to survey the floor and could see it would need a lot of rebuilding with reclaimed tiles. I was confident however it could be saved so set about putting a repair and restoration plan together. From this I was able to identify how many reclaimed tiles I would need and the various products needed to complete the work.

Victorian Tiled Hallway Floor Repair Plan Sheffield

The plan fed into a detailed quote for doing the work that included elements for sourcing the replacements, carrying out the repairs, deep cleaning and finally sealing. My quote was accepted and a date agreed for the work to start.

Repairing a Victorian Tiled Floor

I managed to source all the reclaimed tiles we would need ready for the start date and began by pulling out all the damaged and loose tiles. You have to be careful when doing this so as not to disturb adjacent tiles and make the project bigger than it needs to be. Once done the base was cleared of old adhesive and the work area cleaned up ready for tiling.

Victorian Tiled Hallway Floor During Repairs Sheffield Victorian Tiled Hallway Floor During Restoration Sheffield

With the tiles removed several cracks in the base became obvious that reflected historical movement in the floor which will have led to tiles becoming loose. These cracks were filled and then the work to re-create the geometric tiled design commenced. Putting a floor like this back together is slow but rewarding work, it requires patience and you can’t fail to admire the skill of the craftsman who laid the original tiles. All the missing and damaged tiles were carefully replaced and secured with a flexible adhesive before being grouted.

Deep Cleaning a Victorian Tiled Hallway Floor

Once the floor was whole and set work progressed onto tile cleaning. There were years of ingrained dirt and grime built up in this floor and no history of what may have been applied to the surface to protect it, so cleaning started with an application on Tile Doctor Remove & Go. This is a strong alkaline treatment which was left to soak in for ten minutes before scrubbing with a rotary machine fitted with a black pad. The slurry generated was then removed with a wet vacuum and the tiles inspected.

Next step was to give the floor an acid wash using Tile Doctor Acid Gel which was brushed into the tiles. This further cleans the floor and being an acid will neutralise any alkaline salts and remove other problems such as grout smears. Once done the gel was removed with the wet vac and the floor rinsed to remove any trace of product before the next step of sealing.

Sealing a Victorian Tiled Hallway Floor

The floor was left to dry off for several days, before returning to apply the new sealer. Beforehand the floor was tested with a moisture meter to ensure it was fully dry, we don’t recommend applying sealer to a damp floor as it will affect the result. The readings were fine so the floor was sealed with an initial coat of Tile Doctor Colour Grow to improve colour and then when that had dried Seal & Go to add a lovely finish.

 
Once done the floor looked amazing and my client was overjoyed with the transformation. The new sealer also allowed the reclaimed tiles to blend in very well with the original and it was very difficult to spot the repairs.

Victorian Tiled Hallway Floor After Restoration Sheffield

For aftercare cleaning I recommended the use of Tile Doctor Neutral Tile Cleaner. Most of the tile cleaning products you find in supermarkets are simply too strong for the sealer and can degrade them prematurely.

Victorian Tiled Hallway Floor After Restoration Sheffield


Professional Restoration of a Victorian Tiled Hallway in South Yorkshire

Full Restoration of a 135-Year-Old Victorian Tiled Hallway Floor in Sheffield Read More »

Red Black Quarry Tiled Floor Renovation Peak District Sheffield

1870’s Quarry Tiled Floor Restored in the Peak District near Sheffield

I was contacted by a young couple who had just bought a charming old house with a Quarry Tiled floor nestled on a hill side in the Peak District close to Sheffield. The Peak District is a national park at the southern end of the Pennines surrounded by the cities of Manchester, Derby, Stoke and Sheffield. It’s hugely popular with tourists and attracts millions of visitors every year.

The building dated to the 1700’s, in 1870 a big renovation took place on the house and it is thought this floor was laid then, before 1870 the hallway where the tiled floor is was actually a gap between two buildings but when the buildings were renovated in 1870 the two houses were converted into one.

Red Black Quarry Tiles Before Cleaning Peak District Sheffield

After peeling back, a smelly old red carpet our customers discovered the original hallway tiled floor, but as they started taking the carpet up they realised it was very badly damaged. A few decades ago the house was converted into a Bed & Breakfast and extra bathrooms were put in, a lot of the tiles had been ripped up to run a soil pipe the length of the house.

The new owners were desperate to have the floor put back to its original state, on our first inspection we asked them if we couldn’t fix the floor what would they do, they simply replied ‘We have no plan B’.

We did some moisture readings, inspected the tiles, looked closely at the damage, and came up with a plan to save the floor. Some reclaimed tiles were sourced from the local reclamation yard, they were almost a perfect match.

Restoring a Quarry Tiled Floor

On the first day we cleaned the undamaged areas, this way we could see exactly how much damage there was and see how many tiles we had to replace. We used a combination of the strong alkaline stripper and degreaser Pro-Clean to remove any dirt, grime, and old floor coatings. This is worked into the floor using a black scrubbing pad and then the soiling rinsed off with water and extracted with a wet vacuum.

The floor was then given an acid rinse using Tile Doctor Acid Gel to help fight any salt issues, old floors in old properties aren’t protected from damp by a Damp Proof Membrane so any moisture coming up through the floor can leave salt deposits on the tiles which over time which can damage the clay. This is a much bigger problem with floors that have been covered up for a long time like this one.

The next two days were spent repairing the areas of missing tiles, we had to dig out the concrete and install new sub floors to lay the reclaimed tiles on. Most of the damage was down to a soil pipe that had been dug through the floor and two areas where the central heating system had been installed and pipes laid.

Sealing a Quarry Tiled Floor

Once I was happy with the floor it was left to dry out for a few days to ensure it was dry before sealing, this is important as clay tiles can take a long time to dry and the floor needed to be bone dry to achieve the best results when sealing.

When I eventually returned six coats of Tile Doctor Seal & Go Extra were applied to the floor giving the tiles a lovely satin finish which will protect the floor for years to come.

Red Black Quarry Tiles After Renovation Peak District Sheffield

The young couple were totally over the moon with the floor and for aftercare I recommended Tile Doctor Neutral Clean which is a gentle but effective tile cleaning product that is fine for use of sealed surfaces.


Professional Restoration of Old Clay Quarry Tiled Kitchen Floor in South Yorkshire

1870’s Quarry Tiled Floor Restored in the Peak District near Sheffield Read More »

Victorian Tiled Hallway Before After Restoration Sheffield

Restoration of an Original Victorian Tiled Hallway in Sheffield

During renovations at this beautiful house in Sheffield they discovered an original Victorian tiled floor underneath the hallway carpet.  Incredibly they also uncovered access to a cellar, neither of which they knew idea existed and both were a massive bonus!

Victorian Tiled Hallway Before Restoration Sheffield
Once the floor had been fully uncovered it was in a pretty good condition, some repairs were needed but nothing too dramatic. There was damage around the radiators where the heating engineers have just chiselled through the tiles. Plus, the tiles were stained by adhesive where the carpet grippers had been glued to the tiles.

Victorian Tiled Hallway During Restoration Gripper Removal Sheffield
I discussed with the client the work needed to carry out a full restoration and gave them a quote. They were happy to accept and asked us to proceed as soon as possible.

Victorian Tiled Hallway Damaged Tiles Before Restoration Sheffield Victorian Tiled Hallway Before Restoration Showing Gripper Rod Sheffield

Cleaning and Repairing a Victorian Tiled Hallway Floor

Work started with the removal of the carpet grippers and scraping up as much of the glue as possible, it took some shifting, but it did come up. Any remaining glue was softened up with the application of neat Tile Doctor Remove and Go and then carefully scraped off. Tile Doctor Remove and Go is a multi-purpose stripper that is ideal for removing adhesives and other stubborn coatings such as sealers.

Victorian Tiled Hallway During Cleaning Sheffield
The repairs were done next which involved colour matching replacement tiles and cutting them to the right size. A fast-setting adhesive was used to fix them in place and once the floor had dried it was time to move onto the cleaning.

More Tile Doctor Remove and Go was applied, left to soak for ten minutes, and then worked in with a weighted 42kg buffer machine fitted with a very coarse diamond burnishing pad. This combination not only removed the old sealer but did a good job of removing ingrained dirt as well. The floor was rinsed with water and the soil extracted using a wet vacuum.

Victorian Tiled Hallway During Cleaning Sheffield
Once done the process was repeated using Tile Doctor Acid Gel, this removes stubborn staining and being an acidic product will counter any efflorescence which is a common problem with these old floors. Old floors like this one don’t have a damp proof membrane installed to prevent moisture underneath the tiles rising through the floor and depositing salt as it evaporates at the surface.

A wet vacuum was used to extract the soiling generated during the cleaning process and every tile was rubbed with microfibre cloths to remove the last of the residue.

Victorian Tiled Hallway During Remove Go Glue Removal Sheffield
A nice feature seen on a lot of Victorian floors is an upside tile left by the tiler on purpose, the picture shows the one on this floor. They believed it brought good luck.

Victorian Tiled Hallway Upside Down Tile Sheffield

Sealing a Victorian Tiled Hallway Floor

The floor was left to dry off overnight and I returned the following morning to continue with the final phase of the restoration. Before starting though, the first job was to check the floor was dry using a moisture meter. Once satisfied six coats of Tile Doctor Seal and Go Extra we applied leaving the floor with a beautiful sheen finish.

Victorian Tiled Hallway After Restoration Sheffield
The client was very pleased with the newly restored floor, and for ongoing cleaning I recommended the use of Tile Doctor Neutral Tile Cleaner. This product has a neutral Ph which is ideal for sealed surfaces; stronger bleach-based cleaners are simply too strong for use on sealed tiles and will erode the sealer prematurely.

Victorian Tiled Hallway Damaged Tiles After Restoration Sheffield
 

Professional Restoration of a Victorian Tiled Hallway in South Yorkshire

Restoration of an Original Victorian Tiled Hallway in Sheffield Read More »

Victorian Floor Repair Restoration Sheffield

Repairing and Restoring a Salt-Stained Victorian Tiled Hallway Floor in Sheffield

The owner of this tired and unloved Victorian Tiled Hallway in Sheffield was unhappy with its appearance and decided it was time to have it restored and looked at its best again. As well as renovating the appearance of the floor there was also a damaged area that needed pulling out and re-tiling to match.

Victorian Tiled Hallway Floor Before Restoration in Sheffield

The property and tiling dated back to the 1890’s and hadn’t been maintained in a long time; it is typical of a lot of property in the area which sprung up in the 1890s. At the time the city of Sheffield was devoted to work with chimneys dominating the skyline and population approaching 400,000 and rising rapidly. It pulled in workers from all around and was a time of great change as medieval street layouts were widened to accommodate trams and other vehicles

I visited the property to survey the floor and provide an accurate quote for doing the work. I could see there was an old sealer present on the tiles however this was now worn thin in places and was well overdue for replacement. Also, because it wasn’t a breathable sealer it was trapping moisture in the tiles which resulted in efflorescent white staining.

Victorian Tiled Hallway Floor Before Restoration in Sheffield

Efflorescence is often a problem on these old floors which don’t have a damp proof membrane to prevent moisture rising through the floor. It’s best to allow the floor to breath so moisture can evaporate at the surface, if it becomes trapped it can pool and reach out to the walls resulting in rising damp.

I worked out a plan to strip off what was left of the old sealer, clean the tiles, deal with the efflorescent staining, repair the broken tiles and finally seal the floor with a breathable sealer. My quote was accepted and a date agreed for the work to being.

Repairing a Victorian Tiled Floor

The first job was to repair the areas of damage using replica tiles that I had managed to source the week before. There are several companies you can go to for replicas and these were chosen for their matching colour.

Victorian Tiled Hallway Floor During Repair Restoration in Sheffield

The loose and cracked tiles were carefully removed and cleared away, then the replicas were cut to fit the empty gap and once I was happy, they were laid in place with a flexible adhesive which would allow for some movement.

Deep Cleaning a Victorian Tiled Hallway Floor

To strip off what was left of the old sealer the tiles were sprayed with a dilution of Tile Doctor Remove and Go, this is a strong treatment that breaks down floor coatings. After ten minutes a rotary machine fitted with a very coarse 200-grit diamond pad was run over the floor to work the remove and go into the floor.

Victorian Tiled Hallway Floor During Repair Restoration in Sheffield

The slurry generated was then removed with a wet vacuum and the tiles inspected and any stubborn areas which were then retreated.

Next step was to counter the efflorescent salt problem by applying Tile Doctor Acid Gel which being an acid neutralises the alkaline salts and removes other problems such as grout smears. The gel was worked in using a 200-grit diamond pad fitted to the rotary floor buffer. Afterwards it was removed with the wet vac and the floor was wiped clean with slightly acidic water.

Victorian Tiled Hallway Floor During Repair Restoration in Sheffield

Sealing a Victorian Tiled Hallway Floor

The floor was left to dry off for several days, before returning to apply the new breathable sealer. Beforehand the floor was tested with a moisture meter to ensure it was fully dry.

The readings were fine so the floor was sealed with Tile Doctor Seal & Go Extra which is a full breathable sealer and gives the floor a nice satin finish. Nine coats of Seal and Go Extra were applied in total.

Victorian Tiled Hallway Floor After Repair Restoration in Sheffield

Once done the floor looked brand new and my client was very pleased. The new sealer also blended in repaired section of Victorian tiles with the original.

Victorian Tiled Hallway Floor After Repair Restoration in Sheffield

For aftercare cleaning I recommended the use of Tile Doctor Neutral Tile Cleaner. Most of the tile cleaning products you find in supermarkets are simply too strong for the sealer and can degrade them prematurely.

Victorian Tiled Hallway Floor After Repair Restoration in Sheffield


Professional Repair and Restoration of a Victorian Tiled Hallway in South Yorkshire

Repairing and Restoring a Salt-Stained Victorian Tiled Hallway Floor in Sheffield Read More »

Yorkstone Tiled Floor Renovation Hoylandswaine

Yorkstone Floor Covered in Thick Varnish Renovated in Hoylandswaine

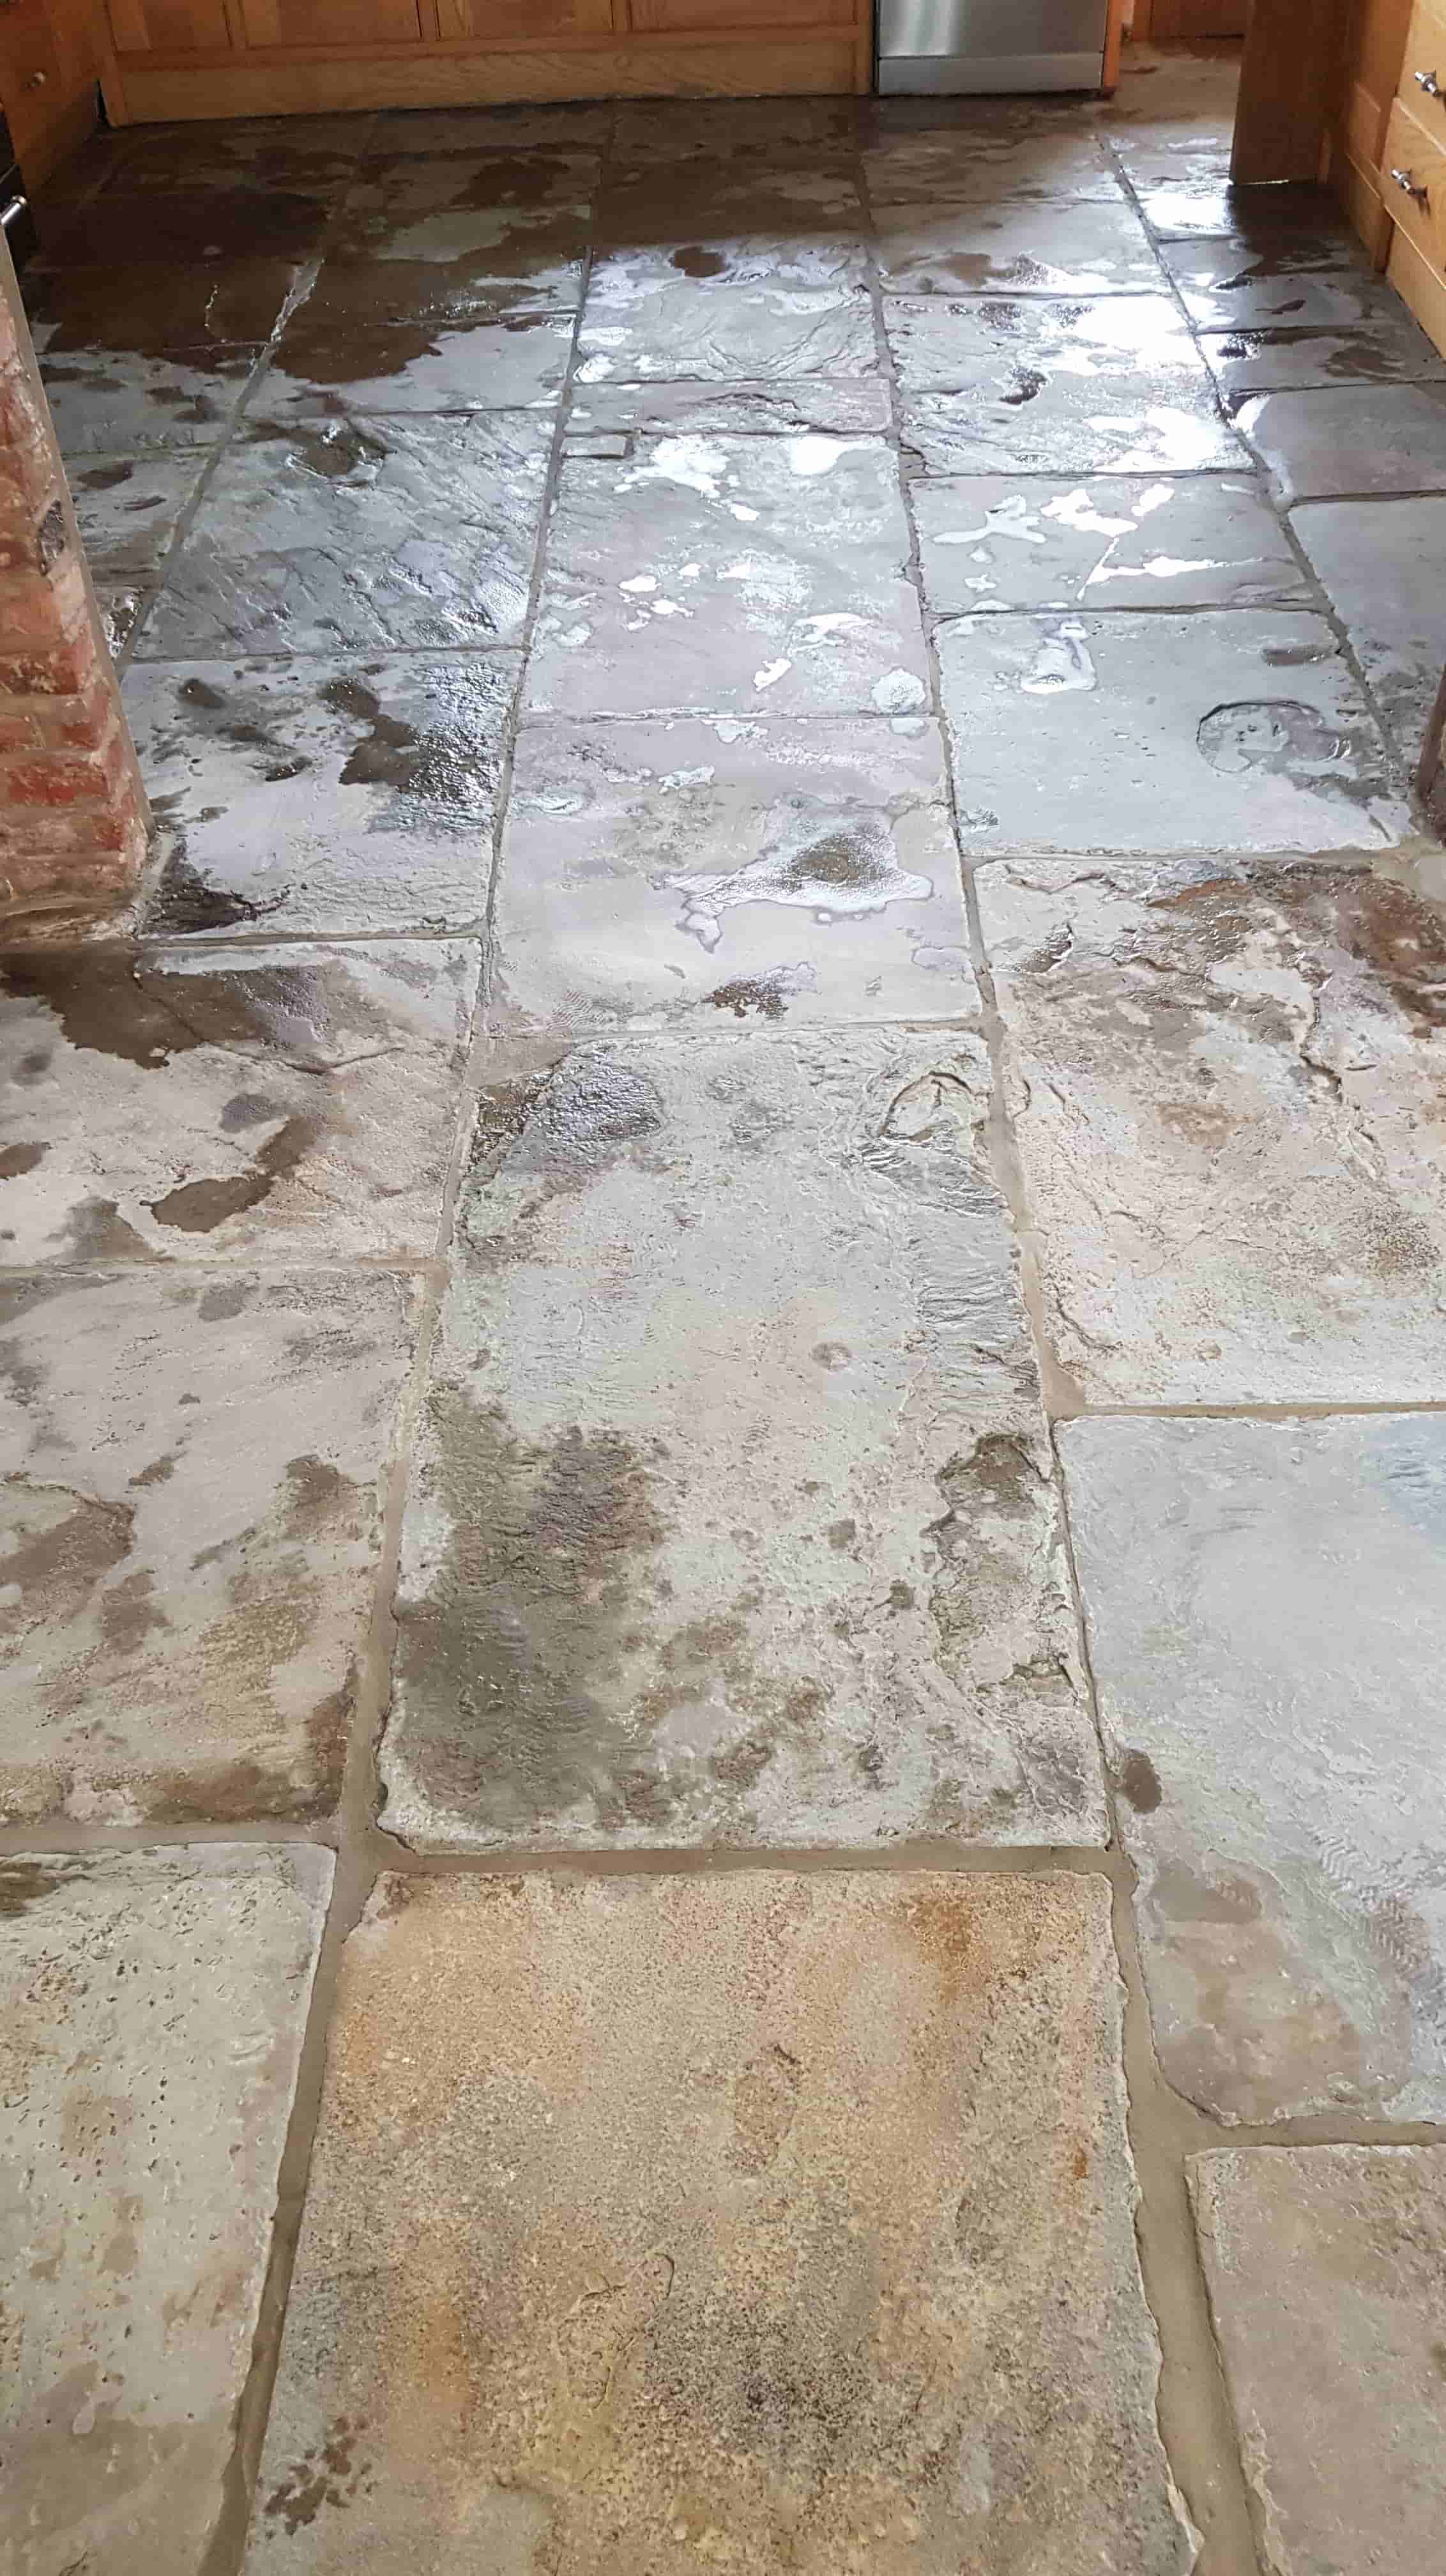
I was asked to visit a stunning old farmhouse in Hoylandswaine Barnsley to look at a Yorkstone kitchen floor which had several problems. The family who lived there were fed up with its black appearance and more importantly how dangerous it was due to a varnish covering that was applied which when wet became an ice-skating rink. The kids would regularly slip over on the very shiny floor, and it was becoming a real concern.

Yorkstone Flooring Before Varnish Removal Hoylandswaine

On my first visit to the property, I was shocked at how dark the Yorkstone floor had become in fact I thought initially it was Black Slate. Yorkstone is a variety of Sandstone that is quarried in Yorkshire and usually contains a range of pale colours visible, and at worst it can get dirty and turn grey.

Yorkstone Flooring Before Varnish Removal Hoylandswaine

After running a few cleaning tests, it was obvious the previous owners of the house had applied many coats of varnish to the floor, and it was going to be quite a job to strip it off.

Stripping Varnish off a Yorkstone Tiled Kitchen Floor

To ensure the best result I tried a range of different products and methods until I came up with a way to strip away the black dirty shiny varnish. Wood varnish isn’t something we often see applied to stone, so a combination of products including Tile Doctor Remove & Go and a heavy-duty polish stripper were applied to the floor and left to soak in.

Yorkstone Flooring During Varnish Removal Hoylandswaine

After leaving the floor for fifteen minutes to soften the varnish it was then scrubbed with a wire brush attachment fitted to a rotary buffer machine and run over each stone for a few minutes. This scraped the varnish off the surface of the stone and started to reveal the natural stone surface for the first time in years. Some areas needed treating two or three times to get rid of all the varnish.

Yorkstone Flooring During Varnish Removal Hoylandswaine

Once I was satisfied all the varnish was gone the stone was given a deep clean using a medium strength dilution of Tile Doctor Pro-Clean. The product was applied this to the floor and left it to dwell for a few minutes before using the rotary floor machine again. This time the machine was fitted with a black scrubbing pad to clean the stone. The floor was cleared of all the slurry using a wet vacuum before being given a final rinse. The floor was left to dry off overnight.

Yorkstone Flooring During Varnish Removal Floor Drying Hoylandswaine

Sealing a Yorkstone Tiled Hallway Floor

Returning the following day, I reviewed the previous day’s work and could see there were a few bits of varnish stuck in the crevices of the stone and around the edges of the room. I managed to remove these using a wire brush fitted to an angle grinder.

Once the floor was cleaned of dust and flakes of varnish it was ready to for the final step of sealing. The client had chosen an impregnating sealer for this and wanted something that would improve the colours and keep the texture in the stone. Three coats of Tile Doctor Colour Grow were applied which as its name suggests brings the colours in the Sandstone out and offers protection from within the stone leaving a lovely finish.

Yorkstone Flooring After Varnish Removal Hoylandswaine

They loved the transformation that had occurred and let the following review.

”Matt provided a professional and efficient service from start to finish. He contacted me straight after I initially emailed and made arrangements to come and look at our floor the same day. After working out what he needed to do he got a quote to me that evening. Matt did a great job removing a thick layer of varnish on our stone floor and it now looks beautiful. I would highly recommend him. Thanks so much!”


Professional Restoration of a Yorkstone Tiled Hallway in South Yorkshire

Yorkstone Floor Covered in Thick Varnish Renovated in Hoylandswaine Read More »

Sandstone Kitchen Floor Clean Seal Maltby

Sandstone Tiled Kitchen Floor Renovated in Maltby, Rotherham

Details below of a Sandstone Tiled floor I recently renovated in the Kitchen of a property in Maltby near Rotherham. Sandstone is a beautiful material however the rough nature of its surface needs to be sealed to prevent dirt from becoming trapped in the stone as once that happens no amount of mopping will remove the dirt.

Unfortunately, sealers wear down with use and in this case with it being the Kitchen it had seen a lot of wear. The stone had become darker, and the grout stained. The local area is well known for its coal mining history; however, my client didn’t want that reflected in their kitchen floor, so I was asked to pay them a visit to give the floor some TLC.

Cleaning a Sandstone Tiled Kitchen Floor

I started by removing the kickboards under the kitchen units and taping up the rest of the cabinets to protect them from splashing during cleaning. This was followed by the application of a medium strength dilution of Tile Doctor Pro-Clean using the usual method of mopping into the Sandstone tile and Grout and then leaving it to dwell and soak in for ten minutes. We do this as it gives the product time to start softening the dirt and grime making it much easier to remove.

After ten minutes I the floor was scrubbed using a rotary floor buffer fitted with a stiff brush attachment. A brush works much better than a pad on riven stone, the bristles get into all the ridges. Once I was happy with the results the dirty slurry was removed by a wet vacuum.

Sandstone Floor During Renovation Maltby Rotherham

I was then able to inspect the floor and spot treat any stubborn stains by hand scrubbing them using the same treatment as before. Once I was satisfied the stone and grout was as clean as it could be the floor was given a thorough rinse to remove any trace of cleaning product and dirt. The floor was dried as much as possible with the wet vacuum and then assisted with fans.

Sandstone Floor During Renovation Maltby Rotherham

It wasn’t a large area, so I planned to seal the floor later that afternoon.

Sealing Sandstone Kitchen Floor Tiles

After lunch I checked the Sandstone for moisture using a damp meter. My plan had worked, and I was able to start applying the first of what would be three coats of sealer. Having discussed sealer options previously with my client we had opted to go with Tile Doctor
Ultra-Seal which is a hard-wearing impregnating sealer that doesn’t leave a finish on the stone, so you get a very natural look.

Unfortunately, I didn’t get a photograph of the finished floor this time around however I took the picture below whilst working between two sections so you should be able to see the difference.

Sandstone Floor During Renovation Maltby Rotherham Left Done Right Outstanding

After completion the sandstone looked so much lighter and cleaner, much to the delight of my client. For aftercare cleaning I recommended they use Tile Doctor Neutral Tile Cleaner which is designed for the regular cleaning for sealed floors like this.


Professional Restoration of a Sandstone Tiled Floor in South Yorkshire

Sandstone Tiled Kitchen Floor Renovated in Maltby, Rotherham Read More »

Mouldy Tile Wetroom Renovated in Doncaster

Revamping a Mouldy Tiled Wetroom in Doncaster

This wet room in Doncaster had become so mouldy and dirty the owners didn’t know what to do with it. The Limestone and Marble Mosaics on the floor and the Ceramic wall tile and Grout throughout the bathroom had become so badly affected with mould, nothing they could buy from could resolve it.

Mouldy Tiled Wetroom Doncaster Before Cleaning

Following my site visit I was confident the room could be cleaned up (in-fact I have seen worse), I explained what we could do to restore and revamp the wet room and they were happy to go ahead with my quote.

Mouldy Tiled Wetroom Doncaster Before Cleaning

Deep Cleaning Mouldy Textured Ceramic Wetroom Wall Tiles

First, I opened windows to maximise ventilation and then working top down I set about tackling the Ceramic wall tile and grout by spraying on a strong dilution of Tile Doctor Pro-Clean. Spraying on the solution mixes it with air making it lighter and easier to stick to the wall where it can soak in and get to work breaking down the mould.

After about fifteen minutes it was scrubbed into the tile and specifically the grout joints where it was needed most. This action releases grime and other contamination from the grout. The room needed a series of different treatments due to the different tiles and areas of mould, so I followed that up with Tile Doctor Duo Clean. This is a bleach-based cleaner which is brilliant at tackling mould and getting the grout back to its original colour.

Mouldy Tiled Wetroom Doncaster During Cleaning

The Ceramic tile in this bathroom has a textured surface which traps dirt so to get them clean I also used Tile Doctor Oxy-Gel. Being a Gel is easily sticks to the vertical surface allowing for longer dwell times which allows the product to dissolve the dirt and make it easier to remove.

Deep Cleaning Mouldy Limestone and Marble Mosaic Wetroom Floor Tiles

With the walls looking much clear for my efforts I turned my attention to the Mosaic floor tiles. For these I went straight in with a cocktail combination of Tile Doctor Pro-Clean and Duo Clean cleaners which I knew from cleaning the wall tiles would have the right impact.

I was also able to use a buffing machine fitted with a poly brush attachment and running at medium speed to do most of the scrubbing. The grout lines were green with mould, and I was able to get this process to return the Mosaics and grout lines back to their original state.

Mouldy Tiled Wetroom Doncaster During Cleaning Mouldy Tiled Wetroom Doncaster During Cleaning

The slurry was removed with a wet vacuum and rinsed thoroughly with water. It took many hours and repeated scrubbing to get the room looking like it should. I was then able to finally leave for the day and allow the wet room to dry out overnight.

Sealing Wet Room Floor and Wall Tiles

I returned the following morning and started by removing all the old silicone from the corners of the room, much of it had become stained and difficult to get clean so replacement was the best option. The waste was removed and replaced with a new bead of mould resistant silicone colour matched to suit the tiles.

The Mosaics has fully dried by this point, so I was then able to apply a sealer to floor to seal in the Marble and Limestone floor Mosaics and grout. I used a couple of coats of Tile Doctor Colour Grow for this, it’s a breathable impregnating sealer that’s suitable for wet rooms. For the wall tile and grout, I used an aerosol sealer which will help protect the walls from getting mouldy and dirty again.

Mouldy Tiled Wetroom Doncaster After Cleaning

Once I had finished, I educated the owners on how to keep up the cleaning of the room supplying them with a complimentary bottle of Tile Doctor Aqua-Pro shower tile Cleaner. This is much better than any supermarket cleaner as it is pH neutral and will ensure that the newly applied sealant will not be prematurely affected. Hopefully, this will ensure it never gets quite so bad in the future however improved ventilation is the real key to solving that problem. They were very satisfied with the work we carried out and as you can see from the photographs on this page, the wet room has been transformed.


Professional Renovation of a Mouldy Tiled Wetroom in South Yorkshire

Revamping a Mouldy Tiled Wetroom in Doncaster Read More »

Yorkstone Sandstone Floor Before and After Renovation Penistone

Yorkstone Floor Deep Cleaned and Sealed in Penistone

The new owners of this converted old farmhouse in Penistone were struggling with its Yorkstone paved floor which continually looked dirty. They had tried to clean it themselves but whatever they tried seemed to have no effect. They found Tile Doctor on-line as their local representative I was asked to survey the floor and recommend a solution.

Dirty Yorkstone Floor Before Cleaning in Penistone

I paid a visit to the house and whilst there conducted a small test clean to show the owners what results could be achieved. I tested a few different products and methods to see what would work best and they were overjoyed with the difference. Happy and confident the stone floor could be renovated we agreed a price and booked at date in to do all 150 square meters.

Penistone is a small market town to the west of Barnsley nestled in the foothills of the Pennines, as it turns out there used to be a Sandstone quarry here so this Yorkstone floor could well have originated from that very quarry.

Cleaning a Yorkstone Tiled Kitchen Floor

Before doing any work, the area was prepped, woodwork was protected, and furniture was moved out of the way so there would be a clear space in which to work.

Dirty Yorkstone Floor Before Cleaning in Penistone

To get the floor clean I started by applying a strong dilution of Tile Doctor Pro-Clean to the floor which was left to dwell and soak into the pores of the stone for about ten minutes. Then a rotary floor machine was fitted with various diamond pads and brushes to scrub the floor. The Pro-clean and scrubbing action released what felt like decades of dirt from the Yorkshire floor and the true beauty of the sandstone started to show through. The resulting brown slurry was then removed with a wet vacuum before a final rinse was done. The floor was large, the work had to be done in small sections scrubbing and extracting until the whole area was clean and repeating the process where necessary.

Dirty Yorkstone Floor During Cleaning in Penistone

There were a few areas with missing and loose mortar between the joints of the stone, so these were raked out and sympathetically repaired.

Dirty Yorkstone Floor During Cleaning in Penistone

By the end of the first day the floor was looking so much cleaner. The next step would be to seal the stone, but it would need to dry out before I could do that.

Sealing a Yorkstone Tiled Kitchen Floor

To allow plenty of time for drying I returned a few days later to seal the floor, first checking the stone was dry with the help of a damp meter. I know from experience that applying sealer to damp stone is a bad idea as it will affect the way the sealer cures and mar the overall finish.

The readings from the damp meter were fine so I proceeded to seal the Yorkstone flagstones with several coats of Tile Doctor Seal & Go. Natural stone like this is slightly porous so it’s important to prevent dirt from becoming ingrained in the stone by applying a sealer and make the floor easier to keep clean. I recommend Seal and Go for Sandstone floors as it adds a nice subtle shine and brings out the natural colours in the stone.

Dirty Yorkstone Floor After Cleaning Sealing in Penistone

The client was over the moon with the result, the floor looked superb and to ensure it stayed that way I took time to discuss aftercare cleaning. I make a point of doing this as I often find homeowners with stone floors don’t realise that most supermarket floor cleaning products are simply too strong for a sealed floor. Its always worth reading the label before buying a cleaning product as many are so strong, they can strip a protective sealer away with constant use leaving it vulnerable.

Dirty Yorkstone Floor After Cleaning in Penistone Dirty Yorkstone Floor After Cleaning in Penistone

For the regular cleaning of Sandstone type floors, we recommended the use of Tile Doctor Neutral Tile Cleaner. This product is pH neutral and so won’t compromise the newly applied sealer.


Professional Cleaning of a Yorkstone Tiled Hallway in South Yorkshire

Yorkstone Floor Deep Cleaned and Sealed in Penistone Read More »

Colouring Cleaning Ceramic Tiled Kitchen Floor Grout in Adwick le Street

Dirty Kitchen Grout Renovated in Adwick Le Street

The owners of this house in Adwick Le Street, which is North of Doncaster, were fed up with the appearance of the Grout in their Ceramic tiled kitchen floor. They had not been able to keep the grout clean and it was now patchy, discoloured, darker and consequently always looked dirty.

I visited the property, to survey the floor and could see the Ceramic tiles and where in good condition, but the grout lines were really letting the kitchen down. I discussed with my client the option of re-colouring the grout, which they agreed was sensible, anything to keep the impossible grout clean. The alternative of scraping out the grout and replacing would be a messy and time-consuming option which we both agreed was not the choice they wanted to go for. I gave them a price to complete the work which they were happy to go ahead with.

Grout-During-Cleaning-with-Grout-Colourant-Pre-Treater-in-Adwick-le-Street

Recolouring Grout on a Ceramic Tiled Kitchen Floor

Before any grout colouring could be done the grout first needed to be prepared, this was done using Tile Doctors Grout Colourant Pre-Treater which is an acid-based cleaner specially made for the job. This product cleans and prepares the grout for the colourant to ensure a better contact with the colourant later. It’s very simple to apply and is simply sprayed onto the grout lines, left to dwell for five minutes and then scrubbed into the grout by hand. Once done the soiled pre-treater is rinsed off with water and removed with a wet vacuum.

Tile Doctor Grout Colourant Pre-Treater

Once the grout lines are dry, they are ready to be coloured, unfortunately this is a manual process which take a lot of attention to detail and can be quite tedious. The best way of doing it I have found is go get down on your hands and knees with a toothbrush and gently scrub the colourant into each grout line, any colourant that seeps over onto the tiles needs to be quicky wiped away before it dries. The one upside however is observing the highly satisfying transformation of the grout as the result is instant and you can see the improvement as you go along.

Tile Doctor Natural Grey Grout Colourant Grout During Colouring with Natural Grey Grout Colourant in Adwick le Street

There are ten grout colours of Tile Doctor Grout Colourant to choose from and in this case the owners had chosen Natural Grey. If you want to save a few points they also sell a Grout Colourant kit that contains both the colourant and the pre-treater. The grout colourant is epoxy based so it remains water and stain proof and will last for years.

I’m not sure the pictures I took do the transformation justice, but my client was over the moon with the difference it had made to the floor. The patchy grout was gone and then whole room seemed brighter.

Grout After Recolouring with Natural Grey Grout Colourant in Adwick le Street

For regular cleaning I recommended the use of Tile Doctor Neutral Tile Cleaner which will keep the floor looking good but is gentle enough to use every day and won’t compromise the colourant.


Professional Grout Cleaning and Renovation in Worcestershire

Dirty Kitchen Grout Renovated in Adwick Le Street Read More »

Scroll to Top